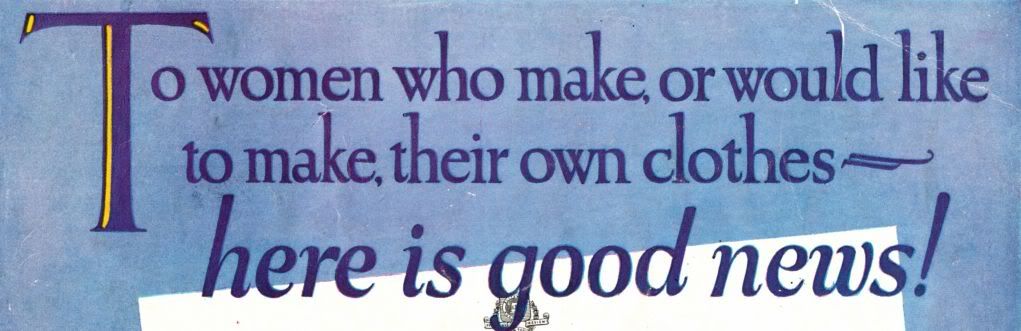
These go from dresses you might wear at home to lovely gowns for your fanciest night out!


"These fascinating fobs may be embroidered on the pocket of the blouse or suit, or even on the collar of one's coat. The faces, hair, and neck treatment may either be embroidered on the fabric, and the ribbon left hanging below, or they may be made separately. The faces, neck, and shoulders be made of kid or a tightly woven silk such as radium, taffeta, or satin. The faces can be transferred to the fabric by tracing over the lines with carbon paper between this page and the cloth. The lines of the faces may be embroidered or inked in, the cheek tinted with water-color, and the hair made with silk or wool of a suitable shade. Where ruffs are shown, these may be added of ribbon or lace. The ornamentation on the front of the figures may be embroidered on the ribbon, or the ribbon may be trimmed with the additional contrasting ribbon for vestees, or with buttons as indicated. The bottom of the ribbon may be gathered into a bead or ornament, or tassels may be added.
Bookmarks
These sketches can be used as bookmark suggestions as well. The heads, necks, and shoulders may be cut out of bristol board, inked and colored, and a narrower section of the bristol board cut and placed between the two pieces of ribbon. You can cut two tiny points for the feet and leave them to protrude from between the two pieces of ribbon. You can get some charming color effects if two different widths of ribbon and two different colors are used. These ribbons can be tacked together or cemented together with adhesive. A bow or ruff of ribbon at the neck will cover the bristol board and the raw edges of ribbon at the neckline."
Lamp - Pulls Pincushions Embroidery Designs
These designs can also be used as a finishing touch to the lamp-pull, instead of the metal chain, or as pincushions that are hung on the wall or on the mirror frame, or as embroidery designs on pockets and bags. If used as pincushions, the under piece of ribbon must be well padded with lamb's wool or felt. If used for embroidery designs on pocket and bags, the faces should be embroidered right on the pocket or bag, and the ribbon left to hang free. The ribbon can be lengthened or shortened, and can be of a color to harmonize with the background. These heads can also be used without the ribbons as hat ornaments and trimmings for pincushions, powder puffs, and nursery accessories."
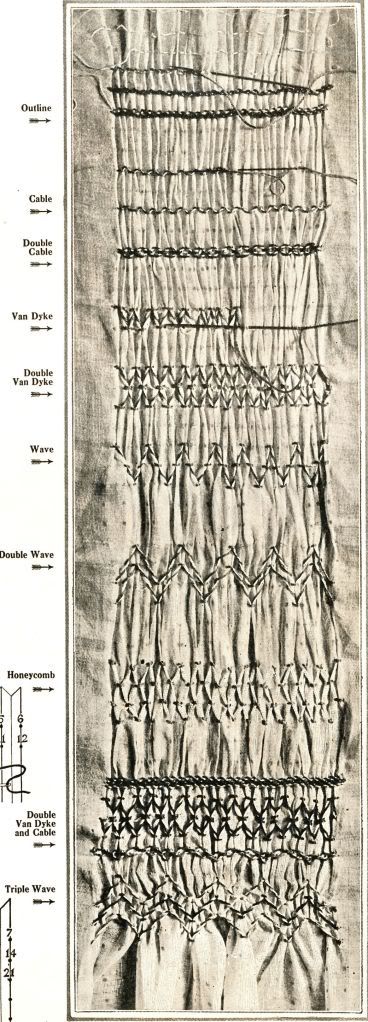
In the early days when a peasant's blouse was not a fitted garment and there were sections that required gathering, in order to make them fit, smocking as a means of gathering the excess fabric came into being, and many were the variations that were introduced. Many of the simpler stitches are illustrated here.
The best aid in smocking is the row upon row of carefully and evenly placed dots, obtained most easily by using a stamping pattern. Usually two and a half times the width of the material (when finished) is required before stamping. You can he assured of more even and beautiful smocking if the gathering is done before the smocking is begun, and the width desired when finished determined and regulated by the gathering threads.
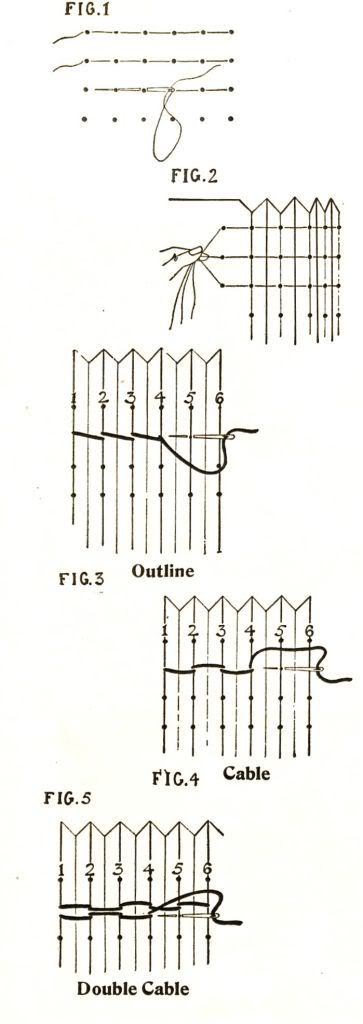
Fig. 1 shows the method of gathering the dots under the needle, and Fig. 2 shows how the material when gathered makes the plaits along the row of dots, which enables you to quickly take up the three or four threads of the fabric. Compress your materials into plaits so that the width of the plaited material is the width you wish for the finished smocking.
Outline Stitch (Illustration No. 3)
The outline stitch is worked on one line of horizontal dots. Begin at the left. Bring the needle up between dots 1 and 2. Pick up dot No. 1, keeping the thread below the needle. Pick tip dot No. 2 and draw slightly together. Continue by taking up dot No. 3, drawing together, then take dot No. 4 and continue, always keeping the thread below the needle.
Cable Stitch (Illustration No. 4)
The cable stitch is worked in the same manner as the outline stitch except that the thread in the first stitch is held under the needle and in the second stitch the thread is above the needle. The third is under the needle and the fourth above, continuing in alternating stitches.
Double Cable Stitch (Illustration No. 5)
The double cable stitch can be worked on one row of dots, keeping the second row of stitches close to the first row, using the same row of dots. If the top or first row is begun with a stitch with the thread held under the needle, the second row of stitches is begun with the thread held over the needle, alternating to the end.
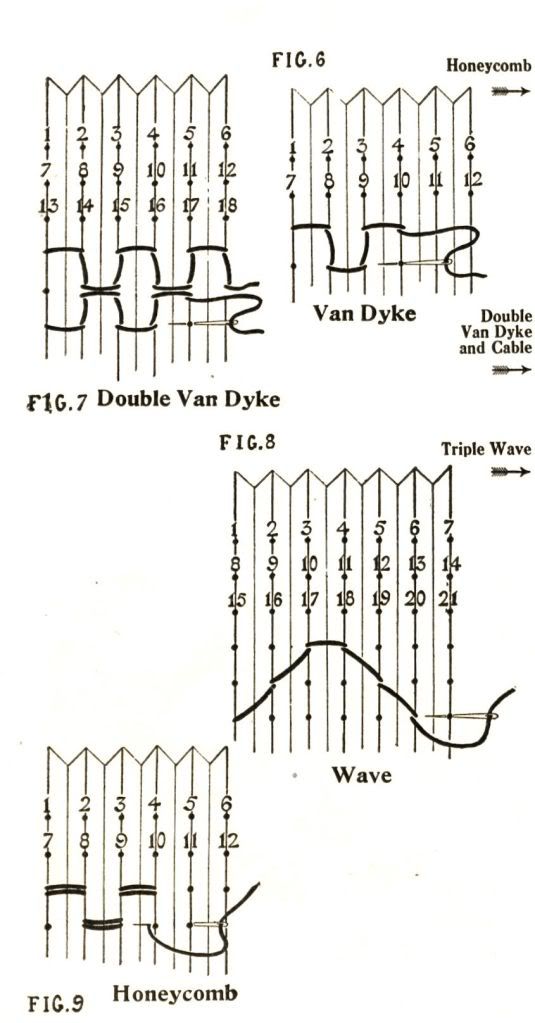
Van Dyke Stitch (Illustration No. 6)
Starting at the left, bring needle up to the right of dot No. 1, take a stitch with the thread above the needle, through dot or plait No. 1. With the thread above the needle, take stitch through dot No. 2 from right to left. With the thread still above the needle, take stitch through dot No. 9. With the thread below the needle, take stitch through dot No. 10. With the thread below the needle, take stitch through dot No. 3. With the thread above the needle, take stitch through dot No. 4. Repeat until end.
Double Van Dyke (Illustration No. 7)
The first row is made the same as the single Van Dyke. The second row begins at dot No. 13, taking a stitch with the thread below the needle. With the thread still below the needle, it goes to dot No. 14. With the thread below the needle, to No. 8. With the thread above the needle, to No. 9, keeping the stitch under the previous row. With the thread above the needle, to No. 15 . With the thread below the needle, to No. 16, and with the thread below the needle, to No. 10, and with the thread above the needle, to No. 11.
Wave Stitch (Illustration No. 8)
Beginning at the left, bring the needle tip to the right of dot No. 15. Take a stitch through dot No. 13 with the thread under the needle. With the thread under the needle, take a stitch through dot No. 9. With the thread under the needle, take a stitch through dot No. 3. With the thread over the needle, take a stitch through dot No. 4. With the thread over the needle, take a stitch through dot No. 12, and with the thread over the needle, to dot No. 20. With the thread under the needle, continue to dot 21. If any of the dots are visible after smocking, remove with gasoline.
Honeycomb Stitch (Illustration No. 9)
Bring thread up through dot No. 1. Stitch No. 1 and 2 together with the thread over the needle. Draw needle through dot No. 2 again, and out through No. 8. Draw 8 and 9 together with thread tinder the needle. Bring through dot No. 9 up to 3, and stitch 3 and 4 together with the thread above the needle. Repeat.


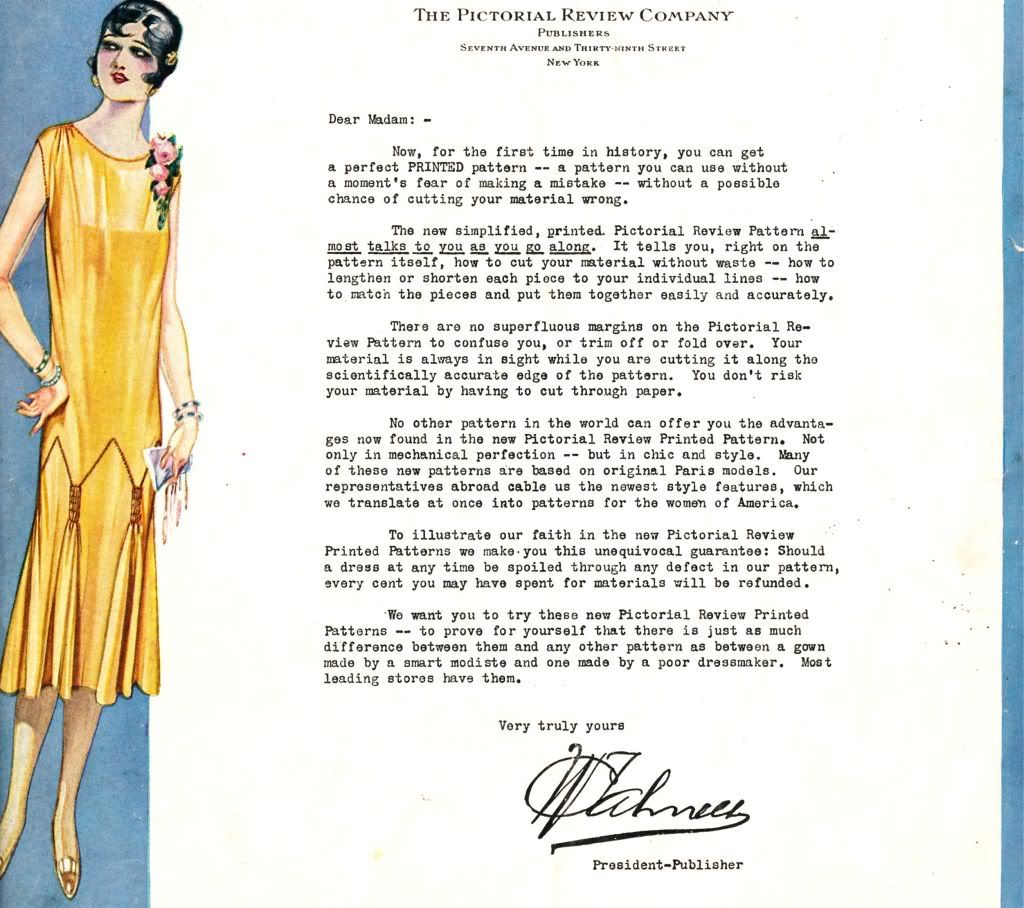

THE PICTORIAL REVIEW COMPANY
PUBLISHERS SEVENTH AVENUE AND THIRTY-NINTH STREET NEW YORK
Dear Madam:
Now, for the first time in history, you can get
• perfect PRINTED pattern -- a pattern you can use without
• moment's fear of making a mistake -- without a possible chance of cutting your material wrong.
The new simplified, printed. Pictorial Review Pattern almost talks to you as along. It tells you, right on pattern itself, how to cut your material without waste -- how to lengthen or shorten each piece to your individual lines -- how to match the pieces and put them together easily and accurately.
There are no superfluous margins on the Pictorial Review Pattern to confuse you, or trim off or fold over. Your material is always in sight while you are cutting it along the scientifically accurate edge of the pattern. You don't risk your material by having to cut through paper.
No other pattern in the world can offer you the advantages now found in the new Pictorial Review Printed Pattern. Not only in mechanical perfection -- but in chic and style. Many of these new patterns are based on original Paris models. Our representatives abroad cable us the newest style features~ which we translate at once into patterns for the women of America.
To illustrate our faith in the new Pictorial Review Printed Patterns we make,you this unequivocal guarantee: Should a dress at any time be spoiled through any defect in our pattern, every cent you may have spent for materials will be refunded.
-We want you to try these new Pictorial Review Printed Patterns -- to prove for yourself that there is just as much difference between them and any other pattern as between a gown made by a smart modiste and one made by a poor dressmaker. Most leading stores have them.